The technology behind this site
This project required a lot of technology to get off the ground -- or under the water, in this case. From image capture to 3D reconstruction, from innovative web design to 3D web implementation that had to be fast even on cell phones. It was fun, and some times hard. This page will go through some of the tech we used.
The source code is available, by the way. And talk to us if you have other questions or similar projects that could use our expertise.
The site uses Vue and Nuxt.JS for its structure. There's not much that's reactive, but Vue made it easier to build reusable components, and Nuxt.JS was helpful to generate a static site out of dynamic data. We were constantly adding images and videos, which required generating thumbnails of different sizes (easily done with a nice plugin), as well as generating some code automatically, such as the statistics on the about page that are generated from a bash script.
A lot of effort went into planning the pages, making content attractive and interesting, and worrying about UX. The fun part of doing unique projects like this one is to solve problems that are a bit unique and new. The species page was such a case: it came from a common thing that divers do when they get back to the boat. "I saw this blue and black fish about this big, what is it called?" Well, let's allow users to search species by color and size.
Dive effect for the home page
"It has to be unique," we said. "It's about a dive site, so... let's dive". The effect of scrolling down and splashing into the water had to be quick to load, performant, but unique.
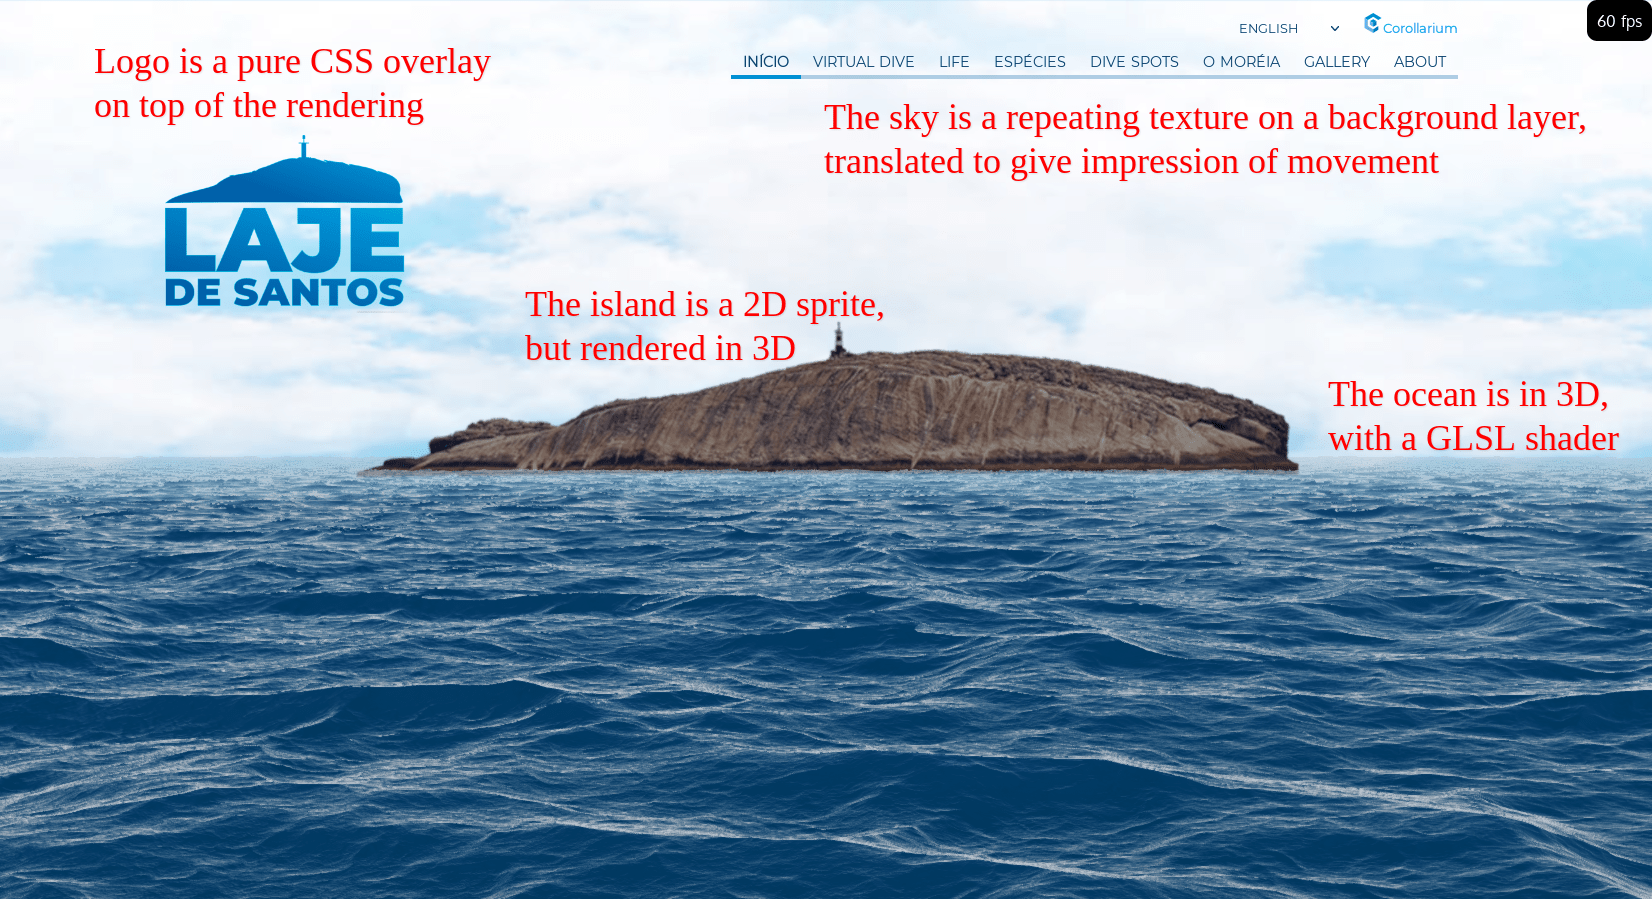
The animation above the fold is a composed of 2D and 3D. The island is a 2D image, which is quick to load -- much quicker than a 3D model, and faster to render. It's mapped to a sprite, so it responds correctly to the camera motion, which is only vertical. The clouds are a background layer, so they don't move at all, as it's expected. Mixing the two effects you get a sense of parallax, that the island is far but not that far, and that the clouds are much farther.
We tried to use a video for the ocean, but not only it was near impossible to get a looping video that looked like an ocean, the water was close to the camera and we needed a perspective change when the user scrolls and dives. We had to go full 3D. For that we used an ocean water simulator that renders the water with GLSL, see below. It's a bit hard on the GPU and we had trouble with Safari thanks to its WebGL implementation (and there's a fallback for it), but on other browsers the effect was striking.
We mapped the page scroll events to the 3D camera position, so as you scroll the camera lowers until you get to the water. This was a bit trickier than expected, since we had to match the scroll size with the 3D translation, which required a bit of "sticky" magic with CSS. An outer div had a larger height (around 250vh) to control the scroll size, and an inner div was stickied inside it with a constant 100vh size. We also had to limit the 3D translation to a sane value, otherwise people would actually go below the water in the 3D view and the effect was not as nice.
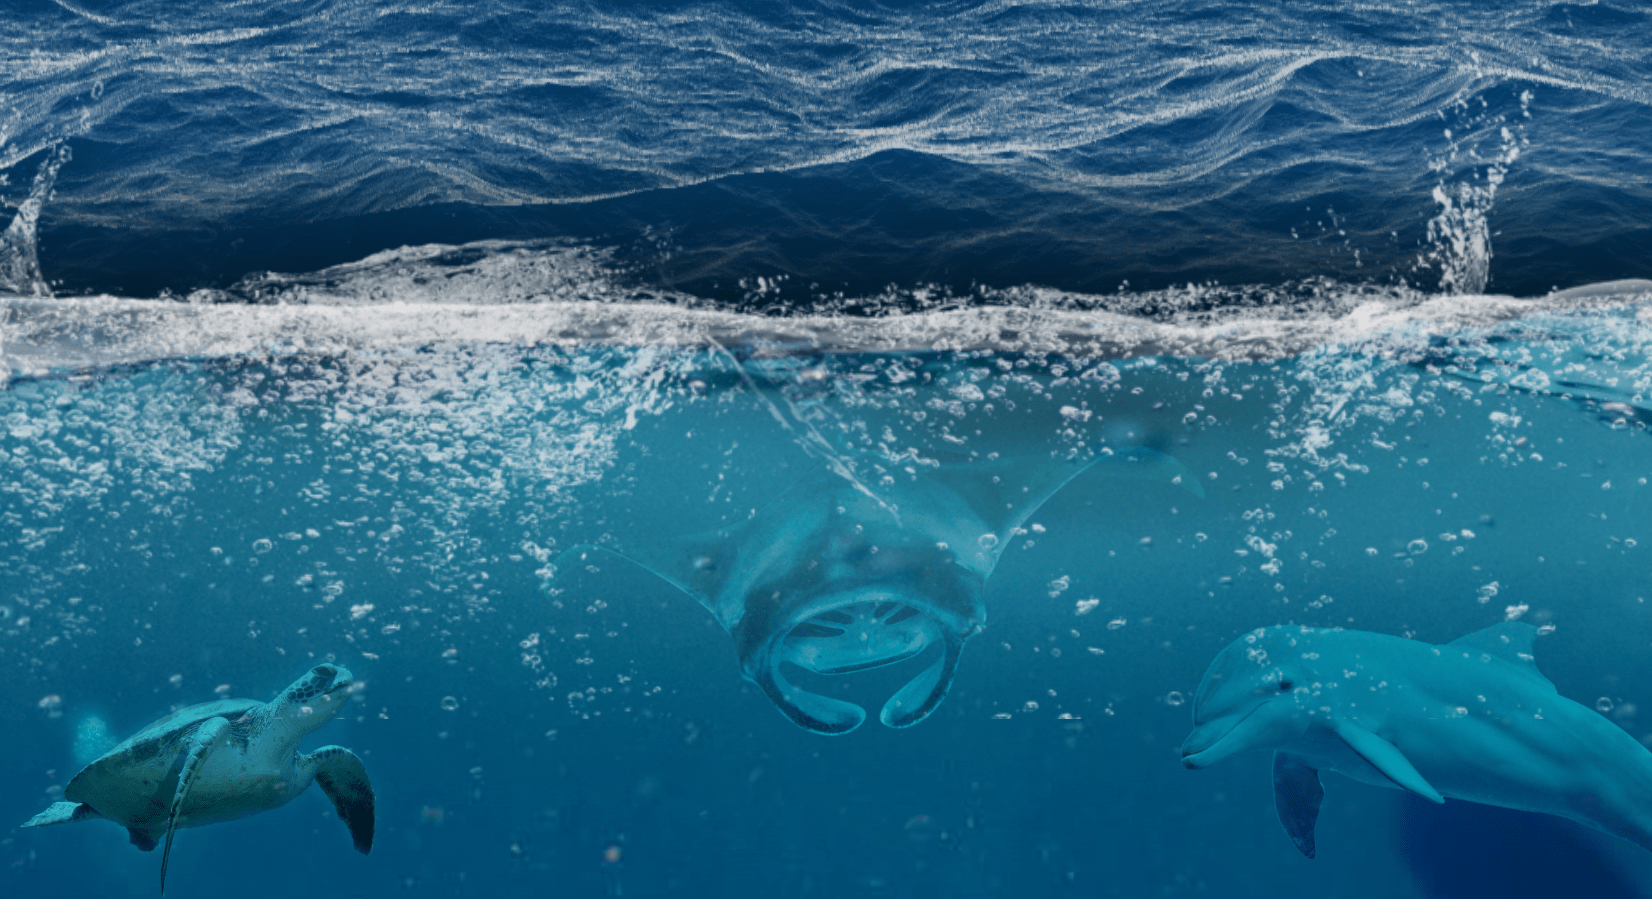
The transition into "underwater" had to move from the 3D ocean back to the 2D HTML page. This was
done with a cool CSS effect where two transparent div were overlayed, and a CSS animation
for a distortion effect made them look like oceans. I don't think a lot of people used
transform: skew in CSS before, but the final effect was cool. It was also heavy: some
browsers just slowed to a crawl when we added the effect and needed some gentle coaxing to work well
again.
CSS and JS everywhere
Reacting to scrolling became much easier after IntersectionObserver was created. We use it all over the site to animate objects when they come into view, and to pause 3D rendering when it comes out of view.
But most of the effects are pure CSS, using animations. That's the case of the liquid buttons, which use :before and :after to render animated waves with the same animation with different periods.
Anything that was "well behaved" in terms of animation was moved to CSS. That is also the case of the swimming fish. They are SVG images, animated with CSS. It's easy to change their color of the number of fish, and makes for a simple effect to add some motion to largely static areas of a page.
The biggest performance problem in all pages is JavaScript, particularly with 3D: a lot has to happen in the main thread, and WebWorkers are not that useful. We're looking forward to WebGPU to get rid of this limitation. Meanwhile, moving things out of the main JS thread results in a smooth animation without worries, which is why CSS animations were preferred whenever possible.
But while JS was kept to a minimum, some effects were more complex and required dynamic code. That is the case of the air bubbles, which are of different sizes, with wobbles and motion at different speeds. They are rendered in a canvas as ellipses - so they are always smooth - but their motion is controlled by a JS loop. A gradient effect on top and bottom makes for a smooth transition.
Panorama reconstruction
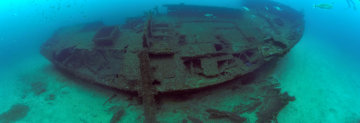
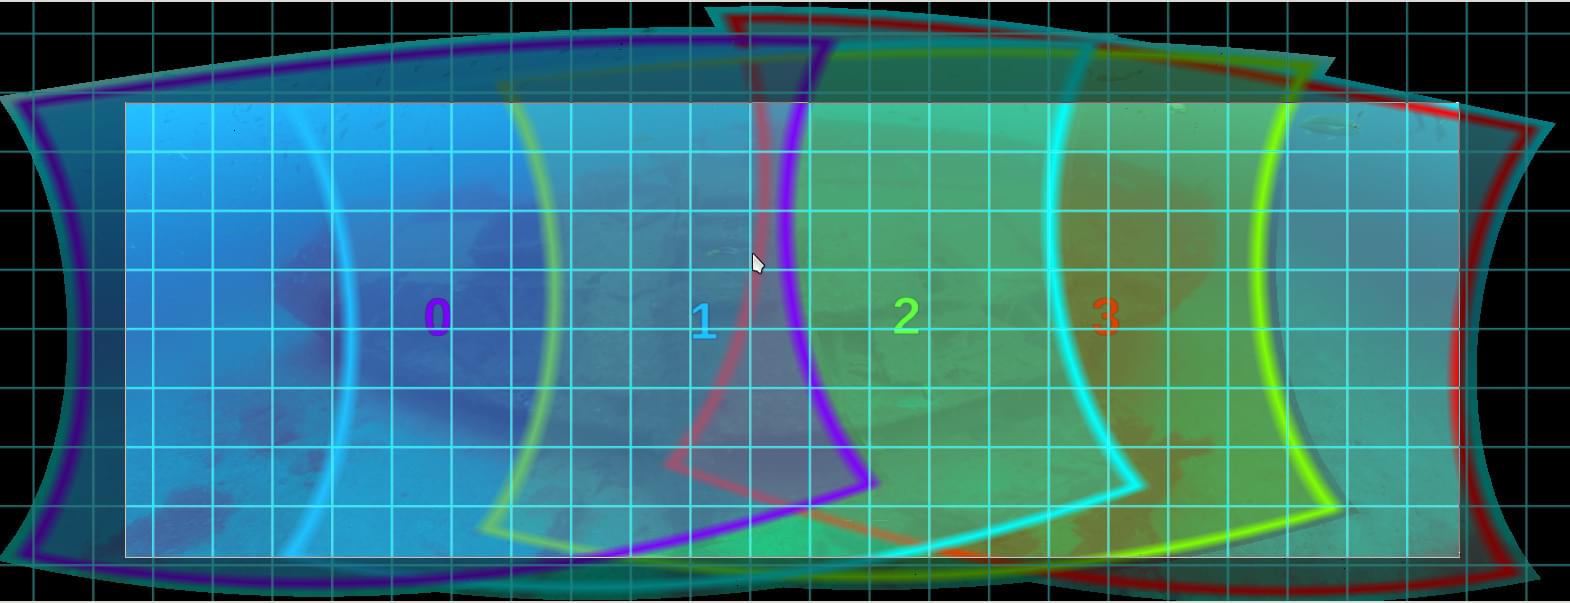
Underwater we can usually see only a few meters. At Laje the Santos the usual visibility is betwen 5m and 12m, and on rare occasions you can see up to 20m. Even on these perfect days, 20m means that "at 20m you cannot see anything anymore", with visibility decaying exponentially before that. Moreia, the wreck, is about 22m long, so it's almost to impossible to take a picture covering all of it. If you are close enough to get a clear picture, you are too close to get the entier wreck into a single picture, even with a wide lens.
This is a composed picture, combining four individual photos, which we took on a day with particularly good visibility to help the final view even more. Hugin was very helpful to compose these images and compensate for the wide lens distortion.
This technique is interesting to provide a flat view as well. TODO
From reality to models: photogrammetry and modeling
We made extensive use of photos in this project to capture data. All animals were hand modeled in Blender from pictures we took. This ensured a beautiful mesh and a simple low-poly version, as well as proper animations made with bones.
Other things were more complicated. The island above the water was easier to reconstruct from existing height data, but underwater we only had rough depth lines from navigation maps. We used our own knowledge to make a rough draft of it. It was unfeasible, given the time and money constraints of this project, to photograph the entire island underwater to reconstruct it with photogrammetry. That would have mean thousands of photos, probably tens of thousands. Perhaps some day. We used hand modelled rocks textured from actual underwater photos.
Moreia, the ship wreck needed a careful reconstruction, though, with realistic data. For it we used photogrammetry. Photogrammetry consists in using algorithms to reconstruct a 3D model based solely on photos. While algorithms take care of the heavy work, there's still some art in taking the pictures properly and making some decisions for the software. We tested several software packages for photogrammetry, but settled on Agisoft Metashape.
Processing hundreds of high resolution photos was not nice to our machines, though. The mesh conversion kept crashing, seemingly for lack of RAM. Large amounts of swap were added, but that made the running times ridiculous (one week!). We ended up running the conversion in a server with 150GB of RAM -- consumption peaked at a little over 100GB, resulting in a mesh with 37 million polygons, that was later decimated to 500k.
And viewing in 3D!
The basic idea of our proposal was using 3D to display information of Laje de Santos, centered on a 3D experience of an actual dive. We wanted to make it as simple as possible to use it, so instead of an executable that had to be downloaded, it had to run in the web.
We use BabylonJS for the 3D rendering. This wasn't planned from the start: our plan was to use solely ThreeJS, but it turned out to have a major problem with multipass rendering and animations with ThreeJS that seemed unsolvable. BabylonJS didn't have such a limitation, and we moved to it later - and even contributed with some code and documentation. Because it turns out that nobody had implemented some of the things we were doing yet using the same technology, we had to write some code that became detached and available as stand alone modules. You can find some remnants of the ThreeJS code on the repo, which is interesting to compare both engines.
Boids
Do you know those striking fish videos with large schools that move together? We wanted that. There is an old algorithm to simulate that flocking behavior, called boids. It's a set of rules to influence each other. There was no library for BabylonJS that we could use, so we wrote our own boids library and released it as a separate module.
The ocean
Rendering water is always difficult. It's a liquid so it's not a fixed mesh, it reflects and refracts light, which is difficult to do without ray tracing. With a large body of water things are even more complicated, since waves need to be faithfully reproduced.
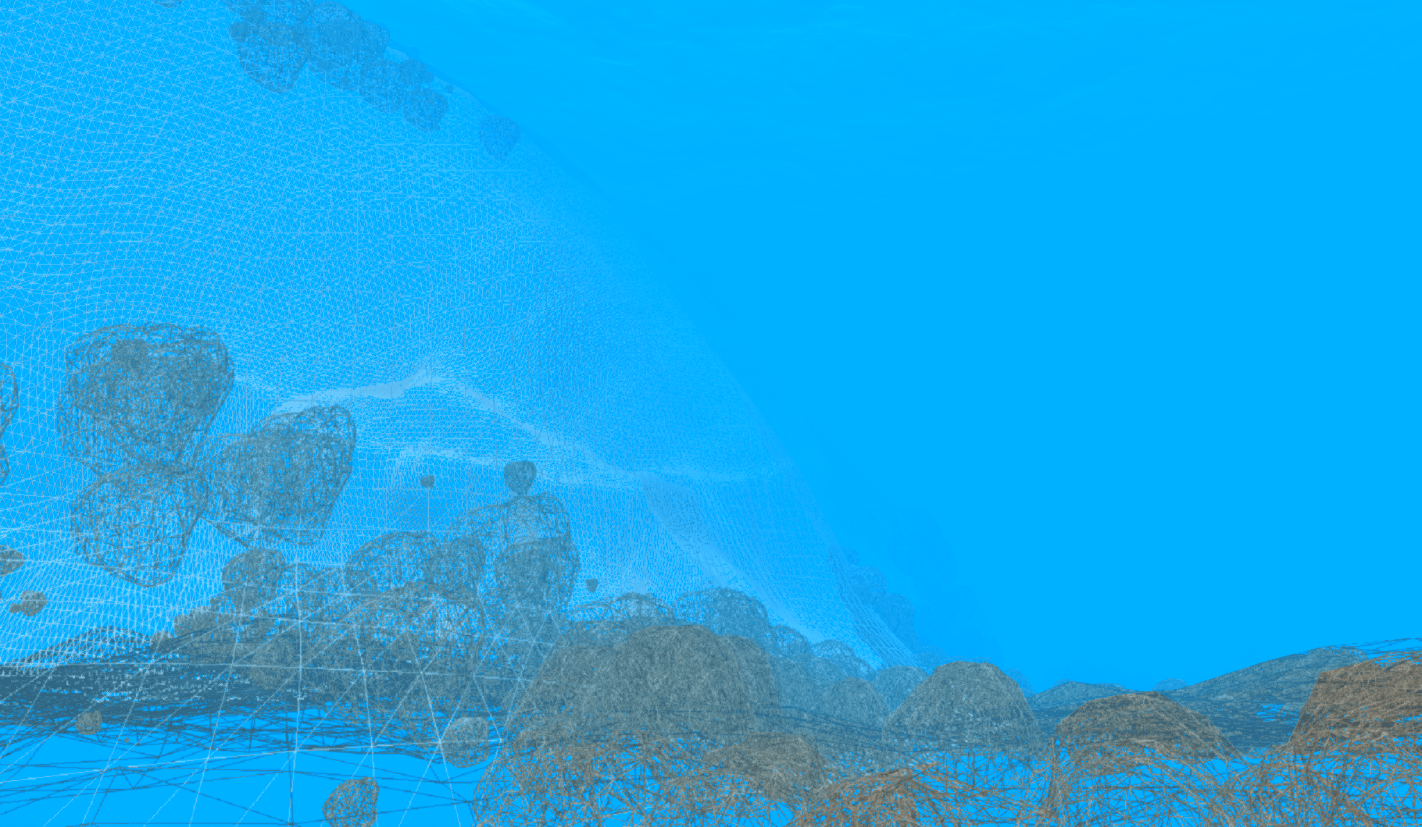
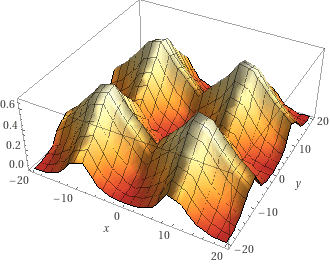
The technique we chose was ray marching with a water wave simulation, based on a shader by Alexander Alekseev. The idea is that the water is close to a plane, but with perturbations in height generated by an animated heightmap. The waves are a composition of sin/cos functions with non-integral exponentials. This looks wavy enough, and by composing different frequencies and amplitudes you get something that looks like an ocean.
So for each pixel in the screen you march on the ray. The basic idea of ray marching is to move a little bit at a time in the ray direction and see if you crossed the surface. The ocean shader in this project is smarter than that and uses a step size proportional to the ratio between a near and far pair of points. These are initially the camera and "infinity", and the extremes are updated iteractively, with this adaptive step size, for a fixed number of steps.
The original shader code didn't work for underwater, though. We updated that shader to properly handle intersections if the camera is below the y=0 plane, and changed the fragment shader color code to make it render a more accurate representation of what you see underwater when you look up. This includes the so called Snell's window, which is the area where you can see the surface because the light is refracted. Outside this area there's total internal reflection. The practical result is a "circle of light" permanently hovering above you. We initially considered implementing this as a fixed plane above the camera, but the ray marching version gives a neater underwater view. Snell's window has strong refraction and works pretty much like a wide angle lens. Refraction based on the normal to the surface, mapped to a spherical textured sky makes things very realistic.
Sky
The sky is added by the post process shader, instead of using a regular skybox. This allows us to use the texture for reflection and refraction, and it's a spherically mapped texture that is mapped to the fragment shader ray direction, which is already computed for the ray marching process.
Underwater effects with multipass rendering
Things look different underwater. Water absorbs light, and does it according to frequency. Red light is almost completely absorbed in the first few meters. By 20 meters deep, which is the average depth of Laje, you're left essentially with green and blue light.
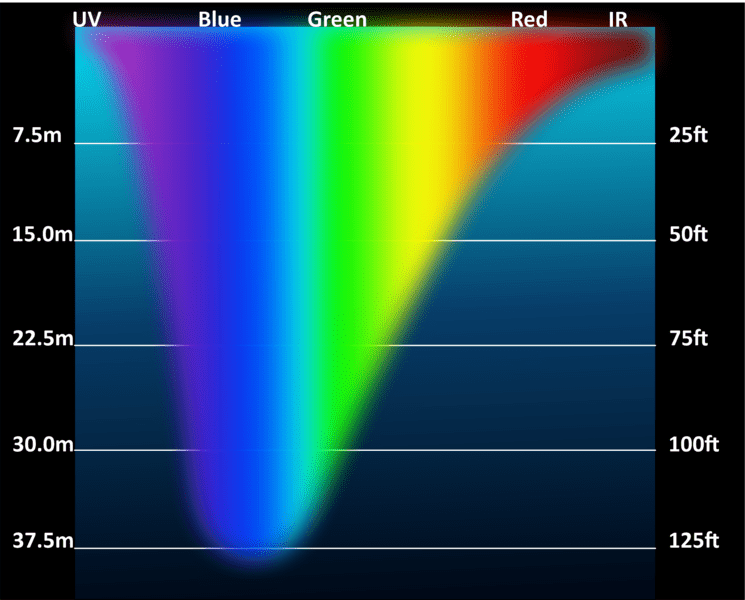
That explains why you see underwater pictures and they are very blueish. Underwater pictures are often taken with a light strobe for close-ups, which makes them "true color", but that doesn't work for far away objects, of course. They're also heavily color corrected on software to make them look "more colorful". This is what a typical image looks like before and after color correction:
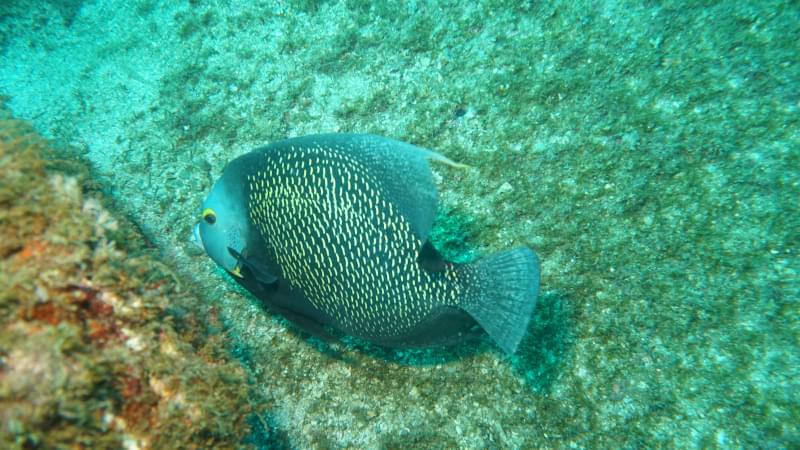
It's interesting how our eyes compensate for that color loss and when we're actually diving things you don't notice the lack of red! But of course, when you look at a purely red object it looks black when you're deep. So we had to implement underwater effects in our rendering.
Besides this blueish coloring, water has caustics. It's that nice light effect you see at the bottom of pools, where light seems to dance in chaotic patterns.
Caustics happen because light is refracted by the waves. It's a pretty effect, and you can easily see it on shallow dives and sunny days. It's pretty, and also pretty annoying to reproduce in 3D. It's impossible to accurately simulate it in real time; calculating the actual light is very expensive computationally. The usual way to do it is using an animated texture that kinda looks like caustics. The texture can be a movie or generated by a noise algorithm. Rendering it on top of actual textures, however, presents a challenge: you need to add the caustic to the normal object colors.
The caustic examples and multipass rendering were contributions of this project to the Babylon.JS project, with a lot of help from their awesome community. There are implications to instances and animations that were a bit tricky to solve, but with their help the final result is amazing and the performance really good.
Another light effect when diving are "god rays", or volumetric light that comes from scattering of particles, just like a dusty room makes light look like a 3D object.
Vertex Animation Textures
The idea of having huge schools of fish was an absolute necessity to this project. It's common to see schools with dozens of fish, particularly salemas and sargentinhos (sargeant majors). This meant we'd need not only to render hundreds of fish, but animate them. Both are demanding tasks in WebGL, since the naïve way to render them (unique meshes, individual animations) is CPU heavy and pretty soon your framerate is bordering zero.
BabylonJS has two ways to handle many copies of the same mesh, with thin instances and particles (more about it below). This was used to render thousands of rocks, but the fish animation was still slow. BabylonJS applies bones to the mesh on the CPU. We can pre-bake the animation with Vertex Animation Textures. The idea is to pre-generate all frames and save the transforms to a texture. Then not only you don't have to compute the animation anymore, but you also can use a vertex shader to apply it on the GPU.
There was no support for VATs in BabylonJS, other than a proof of concept demonstration. We implemented it (with a lot of help from the BabylonJS community -- how awesome and nice the maintainers are!) and it became part of the BabylonJS package. Huge swaths of fish to everyone!
Performance issues with WebGL
We had a number of performance issues with WebGL. They are all linked to the "everything runs on the main thread" problem. Since these popup many times on threads, we'll quickly go over the problems and solutions. The Optimizing Your Scene guide is incredibly helpful.
Too many objects. Engines deal with objects separately by default, so when you add thousands of rocks things get slowly pretty quickly. There are a number of ways to deal with these. Instances are interesting when the objects share geometry but are largely independent. Thin instances are more restricted than instances, allowing you to change position/scale/rotation. Thin instances are always drawn, while instances are checked individually. Solid Particle Systems are an alternative to thin instances that in our implementation turned out to be even faster for thousands of items.
Avoid recomputing constant data. Freeze your assets whenever possible: static objects can have normals, world matrix and material frozen. You can also work with culling, bakeCurrentTransformIntoVertices, doNotSyncBoundingInfo and other settings of BabylonJS to avoid costly checking that is useless.
Move to shaders. Whenever possible write your code in shaders, not JS. Shaders run on the GPU. In particular, bake your animations: animating with bones on the CPU is very costly. See the "Vertex Animation Textures" section above.